Use, maintenance and maintenance of concrete pressure water eliminator
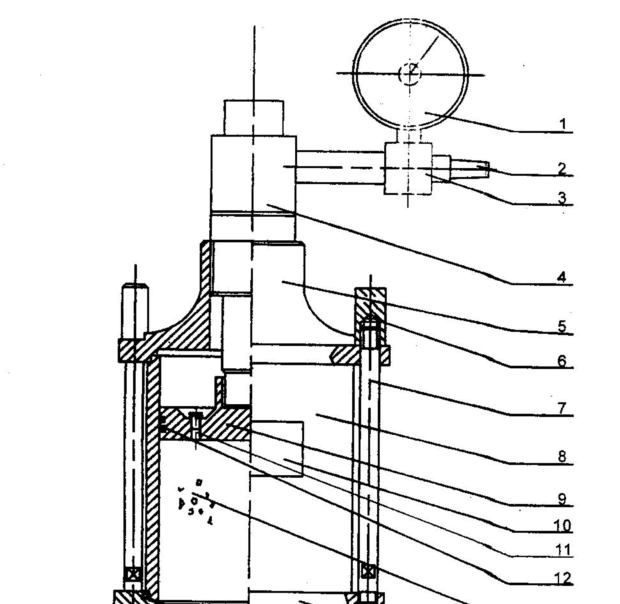
The pressure bleeding device is mainly composed of a hydraulic jack, a pressure gauge and an upper cover piston, a test cylinder, a base and the like.
Pressure bleeding instrument
1. Open the upper cover, put the bismuth mixture to be tested into the test cylinder, insert the cymbal from the periphery to the center 25 times, add the piston, and unscrew the vent screw of the piston to press the piston. To the surface of the concrete, tighten the air outlet screw, cover the upper cover and tighten the nut, and connect the quick connection of the manual pump and the jack (see the structural diagram for details).
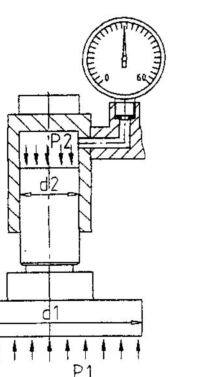
2. Tighten the manual oil return valve clockwise, and pull the manual pump handle to increase the oil pressure to 30mpa (pressure gauge display value). At this time, the pressure of the piston to the bismuth mixture is 3.0mpa.
3. When the oil pressure reaches 30Mpa, immediately open the bleeding valve, and connect the bleeding water into the 1000ml measuring cylinder, and start timing at the same time, and read the bleeding volume V1 and V140 in 10 seconds and 140 seconds respectively, as the calculation of bleeding. The basic data of the rate.
4. After obtaining the data, loosen the oil return valve counterclockwise to depressurize the system, remove the upper cover and the test cylinder, place the test cylinder on the stripper (supplied accessory), and cover the upper cover. Tighten the two nuts. Tighten the oil return valve in a clockwise direction, pressurize the jack to the crucible and the piston automatically falls off, remove the upper cover and the test cylinder, loosen the return valve, and manually press the jack piston back, one test is over.
Pressure bleeding instrument maintenance and maintenance
1. After each test, the instrument should be rinsed with water and dried. If it is not used for a long time, the surface of the parts without paint should be rusted with oil.
2. When installing, the test tube should not be inverted, and a little grease should be applied on the outside of the lower end so that it can be smoothly inserted into the base and sealed with the “0†ring.
3. If the oil pump does not cause the pressure to go up, open the back cover of the oil pump, press the hexagon socket head bolt, add the No. 20 oil, and reinstall it.
Pressure bleeding instrument jack use method
1. Pull the quick joint sleeve on the rubber tube of the oil pump backwards, then cooperate with the joint of the jack, then tighten the oil return valve stem of the oil pump and the jack separately, and pull down the handle to use. After working, relax the above screws at the same time to restore them to their original condition.
2. If the oil pump needs to be refueled, the rubber cover at the tail and the hexagonal screw in the M8 should be removed to expose the oil pipe to refuel. The oil must be clean.
3. When using the extension tube for multiple lifting, select the appropriate length and head as needed.